| Making Fire
Here's a technique you can use to make fire with
polymer clay.
More photos are coming...
|
1.
Make a skinner
roll with fire
colors. |
 |
Choose fiery colors! Of course...
Transparent colors work well.
You can make a "rainbow" skinner roll
with multiple colors, but if you plan
to reduce them to a small size it is
better to use a smaller number of
colors. |
2.
Make two swirled
rolls too. One
with fire colors,
one with smoke and
ash colors. |
|
Don't blend the colors -- just combine
rolls of different colors into a ball.
Then roll it out into a roll and twist
it up and make it a ball again. Repeat
one more time until there is interesting
detail on the surface. Finally roll the
roll out.
Make a second roll with slightly different
colors, maybe transparent or dayglow colors
mixed in, or blend some unique colors and
roll those into a swirled roll. |
3.
If the clay is
very sticky let
it cool off, or
even put it in
the fridge for
a little while. |
|
In the next step you'll slice the rolls into
thin discs.
If the log sticks to your blade, it will
quickly deform the rolls as you cut them.
The resulting discs are easier to work with
if they remain more circular. You can
also reform the discs after every few
cuts if you're in a hurry. |
4.
Slice each one
of the rolls
into varying
sized, discs. |
|
Cut slices between 1/32" and 1/8" thick,
and not necessarily exactly vertically
through the roll. Vary the thickness
randomly. Don't be too careful. Fire
is mostly random anyway. |
5.
Pile up the slices
in a more or less
random order, from
among all the
slices of all the
rolls. |
|
Before I discovered how useful a pasta maker
was, I still wanted to make some layered
effects. So I would create small piles like
this with two, three or four colors, repeated
over and over again.
To make fire you want to select random but
contrasting slices, one after another.
Now stick them together like a pile of
coins (horizontally on the table, of course).
Place them offset with respect to each other,
rather than all in a neat line. I'll often
overlap two of the same style of disc, but
rarely two of the smoke colored disks. |
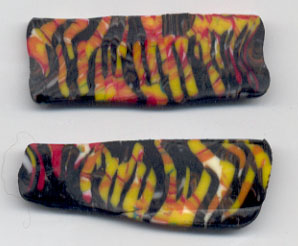
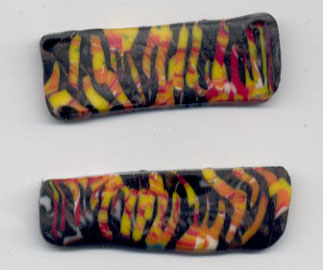
6.
Compress the
sides to form
a rough roll,
but don't actually
roll it. |
|
It actually is a good thing that the edges
of the disks get crushed over in unpredictable
ways. Add to that by pushing some one way
and some the other. Twist them, crush them
a bit and ultimate squash the whole pile down
to more or less of a roll, but don't actually
roll it out much. It doesn't need to be
round. |
Continue |